Tuesday, February 28, 2012

Mall Scavenger Hunt

This past Saturday my oldest daughter, De'yanna turned 15. She wanted to keep it simple so we decided on a mall scavenger hunt. I found the cutest credit card style invitation from http://www.diva-girl-parties-and-stuff.com/ that was a free printable and laminated them.

Front & Back

Then I made up the hunt list and passed them out at the mall to each girl giving them an hour to complete the list. All the girls had to participate and they had to bring back pictures, which would add up to the amount that would be given to my daughter to shop with. The main items were $20-$30 and there were a few bonuses that were $5 each.


They were off and back before the hour was up. To my surprise the hardest one for them to find was a fast food menu(which was only a $5 bonus), but they were determined to complete the list and that they did. They had so much fun with this and still had enough time to shop before meeting up with more friends to go out for dinner. This is a great idea for tweens/teens since they love to shop and they can have fun with  their friends. For the most part the store associates were very helpful to the girls but there were a few that turned their noses at them and said no(what party poopers). They have lots of list ideas online but I would come up with my own because they were kind of boring to me. There are also other types of scavenger hunt ideas online if your child is not into shopping. Whichever idea you decide on your child is bound to have fun......and you will get a kick out of the pictures.
De'yanna's the one with the pink cheetah scarf on

Picture with cheetah panties over their clothes


girls in red hats


Picture with a naked manequin


Picture dressed like a manequin


Dance with a stranger.....aren't they the cutest strangers you've ever seen?


They had so much fun they found another stranger to dance with

fast food menu

One of three logo bags...which no one would give so they had to buy something.

There were a few more bonuses......but you get the point(they aren't as fun to post).

Monday, February 20, 2012

DIY: Chocolate Nest Bowls


Easter is right around the corner so I thought I would show you how to make these cute chocolate nest bowls. I made these with the kids last year to decorate our tables at church and they were super easy. I forgot which blog I got this from so my apologies for not giving recognition.

Omit the cotton candy....it didn't work out


First you want to blow up small balloons to the desired size and grease it(keeps you from fighting to get the balloon out of the chocolate shell).
Melt the chocolate wafers in a bowl

Dip the balloons in the chocolate and place them on aluminum foil or parchment paper.

Next you want to stick the balloon so that the air releases slowly, otherwise if it pops quickly it may cause the chocolate shell to wither. And I didn't do it myself but I suggest dipping it 2 or 3 times because 1 layer is too fragile and will break easily.

Finally, decorate with peeps and chocolate eggs.

You can see where some of my nest bowls broke, but still cute right?


Chocolate bunt cake decorated with peeps and malt eggs.
I hope you all have fun trying this out. Let me know how yours turns out. 

Tuesday, February 7, 2012

Business Progress.....almost there!

I'm so excited!!! I got so much accomplished today regarding my business. I registered the business name, Small Wonders Childrens Event Planning, obtained my business license and business credit card and am in the process of getting my logo created. My website, http://www.smallwondersevents.com/ is under construction but I am in search of a graphic designer to take care of that for me, so I'm 80% of the way there!!! I will keep you all posted.

Free Party!! (UPDATE)

It didn't take long to get responses from my last post so I have started planning my two FREE parties!! One is this month and the other is next month. That's really not a lot of time but I can guarantee that my clients will be pleased. Off to work I go. Pic to come!

Monday, January 23, 2012

Free Party!!

As I am starting my business venture I need to build my portfolio. I am offering a free custom party for 8 children, boy or girl. Party will include custom theme of choice, decoratons, invitations, favors, thank you cards and games/crafts depending on type of party. If you know of someone or you yourself are interested please send me an email to chris@smallwondersevents.com.

Saturday, January 21, 2012

Count Your Blessings

Hello followers,
     Today I am counting my blessings and thanking the Lord for the everyday things that we all take for granted. It's funny how we don't realize how blessed we are until we see someone in a wheelchair or hear that a mother has lost her born or unborn child. It's not the obvious tangible things that I am talking about like food and shelter but the things that money can't buy like my sanity, my joy, my peace of mind, my sight, the use of my limbs and most importantly my LIFE..... just to name a few. I wake up every morning(sometimes afternoon) to a family that LOVES me, I STAND up, WALK to the bathroom, LOOK in the mirror, LISTEN to the news, and continue to  DO things for myself and others all day. I have friends that love me and parents that support me in more ways than one. I could go on and on but I think you get my point. I know life isn't always easy, sometimes it's a downright daily struggle but everyday brings another opportunity to do things right, to do things better.  Do you count your blessings? Do you thank God for his grace and mercy? Do you ever look at someone else and thank God it's not you? Perfection was never God's intention and whatever you feel you are lacking I'm sure it's compensated by something else. Just remember that you may not be able to sing but you have a voice, your vision may not be great but you have insight, you may not be able to walk but you can stand for something. Don't underestimate your abilities and your talents. Use them because God gave them to YOU for a reason. Nobody can do what you do the way that you do it. So count your blessings and praise God like never before!

Wednesday, January 11, 2012

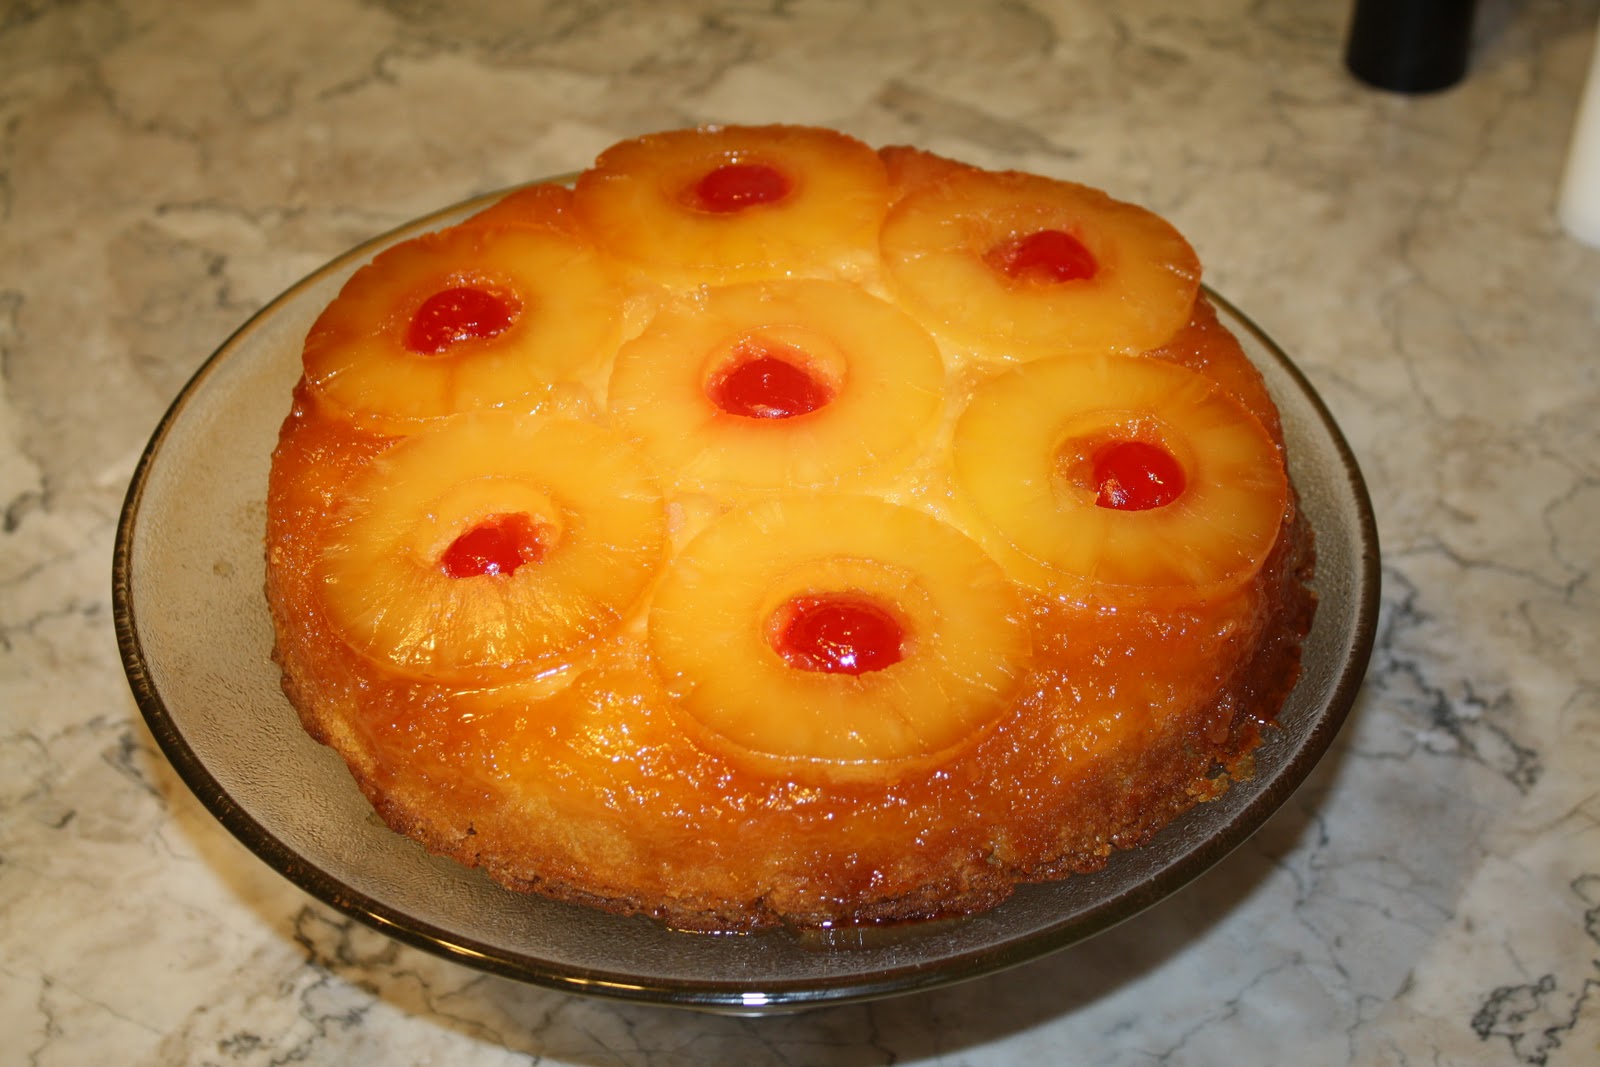
Eva's Pineapple Upside Down Cake

Last week Eva Longoria was on "The Chew" promoting her new cookbook "Eva's Kitchen"..........I know right, who knew. Well anyway, she made her grandmother's pineapple upside down cake and I had never had it before but it looked sooooo good that I couldn't resist trying to make it. It was so easy to make and just as delicious as it looked on tv. I may just have to go buy the cookbook. You have to try it for yourself.


Sooooo moist!
Here's the recipe:

ingredients
· 2/3 cup Unsalted Butter (room temperature)
· 1/2 cup Packed Light Brown Sugar
· 7 Pineapple slices
· 7 Maraschino Cherries (optional)
· 1 1/2 cup All Purpose Flour (or cake flour)
· 1 cup Sugar
· 2 teaspoons Baking Powder
· 1/2 teaspoon Salt
· 2/3 cup Milk
· 1 teaspoon Vanilla1 Egg
kitchenware
· 9x9 baking pan
· Hand Mixer
· Measuring Cup (set)
· Measuring Spoons
· Mixing Bowl
steps ingredients per step instructions
·
Step 1
1/3 cup Unsalted Butter (room temperature)
1/2 cup Packed Light Brown Sugar
Preheat oven to 350F. In a flameproof 9-inch cake pan, melt 1/3 cup of the butter over low heat. Sprinkle the brown sugar evenly over the butter and cook, stirring, until the sugar and butter are blended and there are no pools of melted batter, 2 to 4 minutes.
·
Step 2
7 Pineapple slices
7 Maraschino Cherries (optional)
Arrange the pineapple on top of the caramel. Decorate with cherries if desired, placing them in the center of each pineapple slice. Set the pan aside.
·
Step 3
1 1/2 cup All Purpose Flour (or cake flour)
1 cup Sugar
2 teaspoons Baking Powder
1/2 teaspoon Salt
2/3 cup Milk
1 teaspoon Vanilla
1 Egg
1/3 cup Unsalted Butter (room temperature)
In the work bowl of an electric stand mixer fitted with the paddle attachment, or in a large mixing bowl with a handheld mixer, place the flour, sugar, baking powder, and salt and mix on low speed until well combined. NOTE: Eva likes to use cake flour.  Add the remaining 1/3 cup of butter along with the milk and vanilla. Beat on medium speed for 2 minutes. Scrape down the sides of the bowl. Add the egg and beat on medium speed for 2 minutes. Pour the batter over the pineapple.
·
Step 4
  
Bake until the cake is golden brown and a toothpick inserted in the center comes out clean, 40 to 50 minutes. Remove the pan from the oven and carefully tilt it in all directions to release the cake from the sides of the pan. Let cool in the pan for about 3 minutes. Turn the pan over otno a serving plate and let stand for 2 to 3 minutes. Carefully lift the pan off the cake. Use a spatula to remove any fruit that is stuck to the pan and place it on the cake. Serve warm or at room temperature.